
Replace alarm line printers. Custom events for alarms and notifications
Task:
We want to replace our alarm line printers in our Control Center and setup audio notification on ALARM messages.
Requirements:
- Advanced Serial Data Logger Professional, Enterprise, or a trial version;
- Data timeout
- Events generator
- Events notification
It is assumed that:
The program is installed successfully.
Solution:
This task can be solved using alert sounds that will be played when the program detects the specified signature in a printed message. You may use a combination of two plugins: Event generator and Events notification.
Event generator - the plugin can generate an event if it finds some text in the parsed data.
Note: because this plugin works with parser variables, therefore the parser should work correctly and extract data packets from a common data flow;
Event notification - executes specified actions for one or more events. For example, it can play sounds or send emails.
Configuration:
1. Create a configuration in our logger by clicking the "Green Plus" button and configure the connection:
1.1 RS232 printer - select a COM port and configure the hardware flow control (fig. 1,2).
1.2 RS232 printer via the RS232-Ethernet converter - the settings depend on the converter and its operation mode. If the converter can create a virtual COM port on a target computer, you may configure a typical COM connection. If the device converts an RS232 stream to a pure TCP stream, you should configure the TCP connection.
1.3 Network line printers - the default TCP port for the network printer is 9100 (fig. 3). Our software should work as the TCP server.

Fig.1. COM port settings

Fig.2. Hardware flow control settings

Fig.3. TCP settings
2. Configure a log file.

Fig.4. The log file settings
3. Select and configure the parser. To configure the parser, click the "Setup" button near it.

Fig. 5. Plugins
The expression "#0D" means that each line ends with the <CR> ASCII character. If it does not work you may try "#0A" (ASCII <LF>). Leave other parser settings unchanged.

Fig. 6. ASCII Data Parser
4. Select (fig. 5) and configure the "Events generator" plugin (fig. 7). The "ALARM" event will be triggered if a line will contain the specified text. In this example, the event will be generated for lines with the "Abnormal" text.
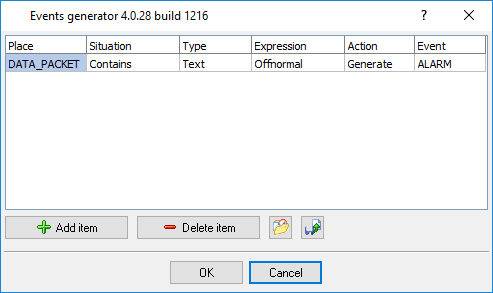
Fig.7. Events generator
5. Select and configure the "Events notification" plugin.

Fig.8. Events notification plugin
5.1 Add the new event handler.

Fig.9. Adding the new event handler
5.2 Simple notification - play a sound.

Fig.10. Configuring the notification
Then click the "OK" button and save all settings. As from now, the program will play the sound for each alarm.
Related articles: Replace alarm line printers. Custom events for alarms and notifications
Related topics: Advanced Serial Data Logger
hereSerial port interface | RS232 port logger | Com port logger | Data acquisition | RS232 data logger | Data Logger Software For Electricity Meter | RS232 to ODBC | RS232 to MySQL | RS232 to MS SQL Server | RS232 to database | Barcode to Excel