bg

DCOM Configuration (Dcomcnfg) on Windows 10, 11, Windows Server 2019, 2022

Download a Free Trial Version. It allows you to try all features! Plugins can be downloaded separately here

4. Specifying DCOM properties

For OPC servers to run correctly, you should specify the DCOM network and security properties.
There is no need to configure OpcEnum because this service is automatically configured when you install OPC Core Components.
This example shows how to specify the properties for the test OPC server "Test OPC Server" (it is a 32-bit application). You can configure the DCOM parameters using the control panel of the Windows ComponentService. Depending on the word size of the operating system and the OPC server application, you should run the corresponding version of the control panel:

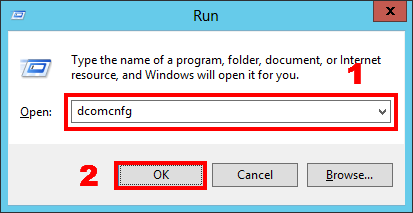
  1. 32-bit version of Windows - dcomcnfg command (fig. 19.1).
  2. 64-bit version of Windows and 64-bit OPC server executable file - dcomcnfg command (fig. 19.1).
  3. 64-bit version of Windows and 32-bit OPC server executable file – mmc comexp.msc /32 command  (fig. 19.2).

To run the command from the command line, open the Run dialog box by pressing Win+R on the keyboard.

Starting Component Services (case 1)
Fig. 19.1 Starting Component Services (case 1)

Starting Component Services (case 2)
Fig. 19.2 Starting Component Services (case 2)

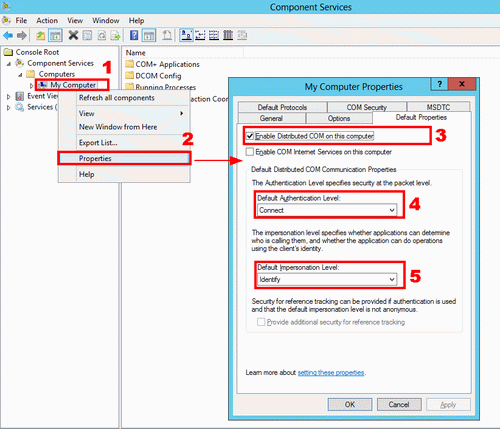
4.1 Specifying the default properties

Properties
Fig. 21 Properties

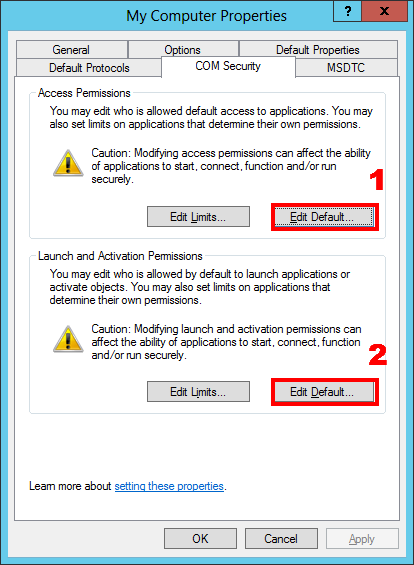
COM security
Fig. 22 COM security

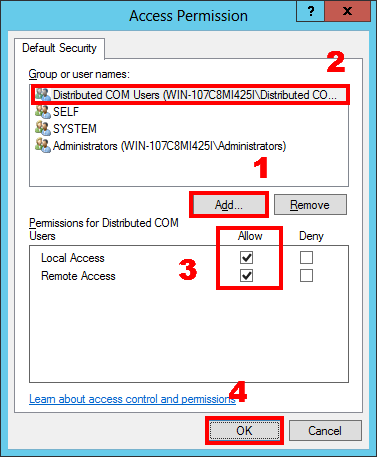
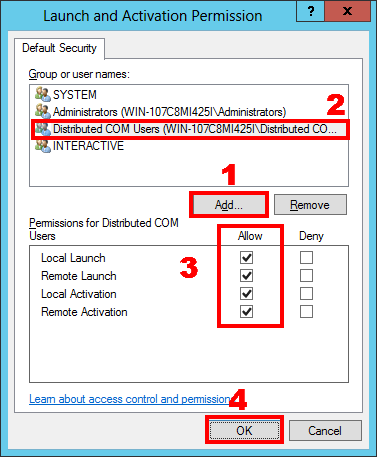
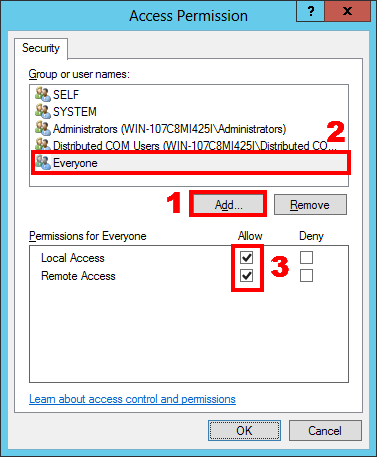
Click button 1 (fig. 22). In the new dialog box (fig.23):

  1. Click the Add button;
  2. Add the DCOM users group by performing operations similar to those shown in figures 7 – 9;
  3. Set access permissions for it;

Click the OK button to save the changes.

Configuring access permissions
Fig. 23 Configuring access permissions

Repeat the operations in the Launch and Activation Permission dialog box (fig.24) that appears when you click the Edit Default button (fig. 22).

Configuring launch permissions
Fig. 24 Configuring launch permissions

Delete all protocols except for TCP/IP on the Default Protocols tab (fig.25) and click OK to save the changes in the My Computer - Properties dialog box.

Configuring protocols
Fig. 25 Configuring protocols

4.2 Specifying OPC server properties

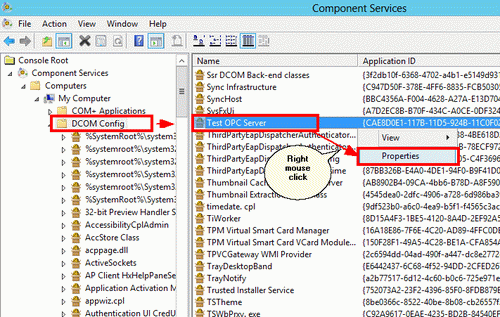
Specifying DCOM properties for the OPC server
Fig. 26 Specifying DCOM properties for the OPC server

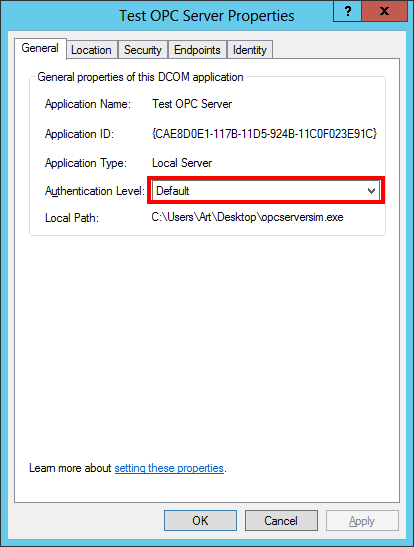
Since all properties have already been specified for the entire computer, you should make sure that the OPC server uses the default properties.

General OPC server properties
Fig. 27 General OPC server properties

Fig. 28 Security properties

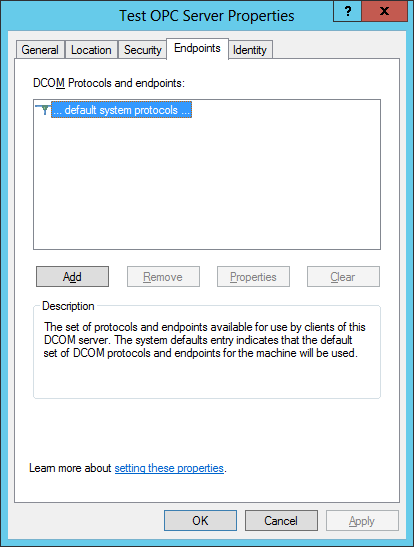
Endpoints
Fig. 29 Endpoints

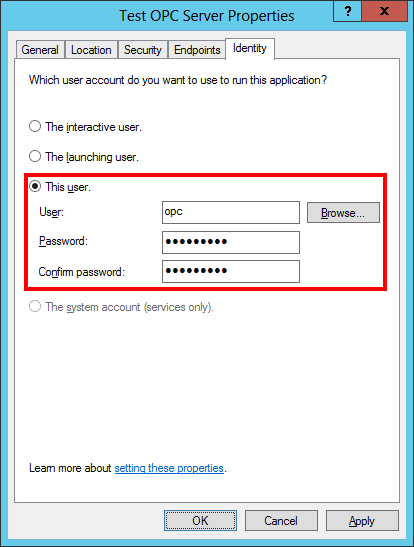
Identity
Fig. 30 Identity

You should specify the previously created user that will launch the OPC server on the Identity tab.
Note 1. Before you edit the properties of the OPC server, you should make sure that it is not running and is absent in the list of active processes. Or restart the OPC server after you edit its properties.

Note2. It is necessary for some OPC servers to be launched with administrator permissions at least once in order to get registered in the system and initialize the parameters of the OPC server. They will be available for detection via OpcEnum and connection only after such initialization.

4.3 Configuring the Everyone access to OPC servers

Attention! Access permission for everyone may lower the security level of the computer.
Sometimes it may be necessary to permit access to the OPC server for everyone, including anonymous users. For example, when the computer with the OPC server does not belong to a domain, and many clients connect to the server.

Advantages:

  1. It is possible for the computer with the server not to belong to the domain;
  2. No need to create users on the computer with the OPC server;
  3. Users can run the OPC client using their own account.

Disadvantages:

  1. Lower security because of the remote access to DCOM for everyone.

If you want to provide access to the OPC server for everyone, you should configure individual access permissions for the selected OPC server.
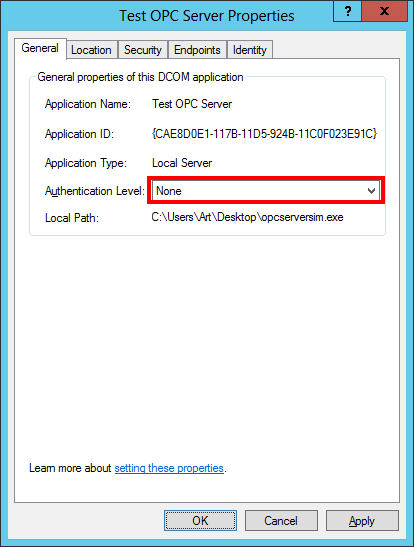
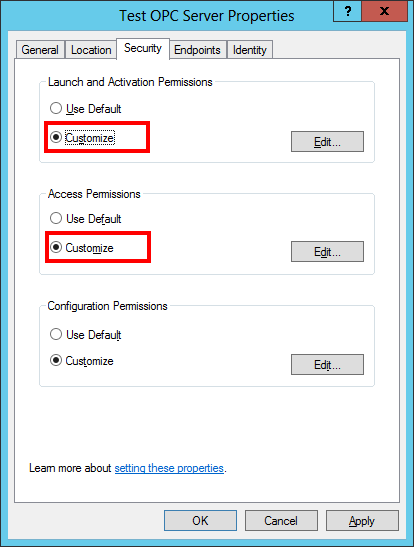
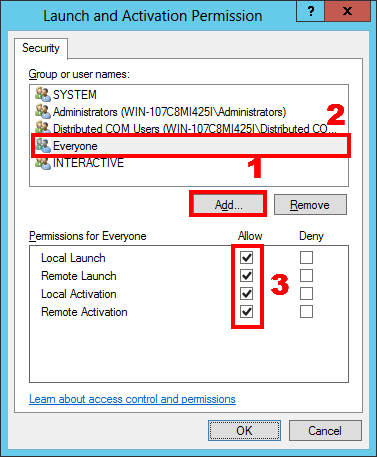
Open the DCOM properties for the OPC server, as shown in section 4.2, and edit them according to fig.31 – fig.34. The other properties must correspond to the ones specified in section 4.2.

General properties
Fig. 31 General properties

Security properties
Fig. 32 Security properties

Launch and activation permissions
Fig. 33 Launch and activation permissions

Access permissions
Fig. 34 Access permissions

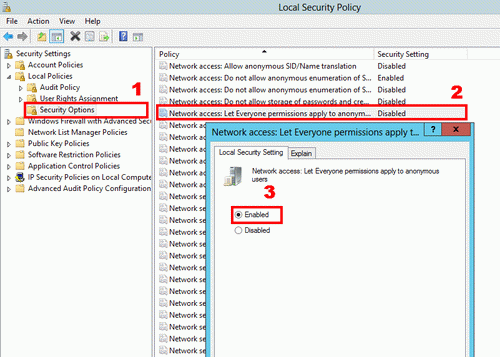
You should configure the local security policy. To do it, you should open the Local Security Policy console. You can open the console by moving the mouse pointer to the corner and selecting Settings - Control Panel - System and Security - Administrative Tools - Local Security Policy. You should go to the Local Policies: Security Options section. And set the rule Network access: Let Everyone permissions apply to anonymous users to Enabled (fig. 35).

Security policy properties
Fig. 35 Security policy properties

If you change the security policy (as shown in fig. 35) and OPC clients cannot get the list of OPC servers and connect to them, you should specify and save advanced security policy properties (fig. 36-37).

  1. DCOM: Machine Access Restrictions in SecurityDescriptor Definition Language (SDDL) syntax
  2. DCOM: Machine Launch Restrictions in Security Descriptor Definition Language (SDDL) syntax

DCOM: accessrestrictions
Fig. 36 DCOM: access restrictions

You can find a detailed description of how to add a group or user in section 2.2.

Related articles: DCOM Configuration (Dcomcnfg) on Windows 10, 11, Windows Server 2019, 2022

OPC and DCOM Configuration on Windows 10, 11, Windows Server 2019, 2022

Advanced OPC Data Logger - Read more about:

OPC Logger RS232 pinout and signals Cables and signals Data monitor cables